Posts

SET WALLPAPER IN DEFAULT
Image
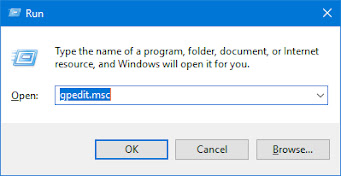
  SET WALLPAPER IN DEFAULT  ✨ Set Default Background Wallpaper for Windows 10 Desktop Using Group Policy ⭐Use the  Windows key + R  keyboard shortcut to open the Run command. Type   gpedit.msc  and press Enter. ⭐Select User Configuration -> Administrative Templates -> Desktop -> Desktop. Double-click the Desktop Wallpaper policy on the right side. ⭐Select the Enabled option, and then type the path of the image you want to set as a default background. Click Apply and OK. ⭐Right click on the Start Menu Button and select command prompt or command prompt (Admin) to open the CMD window. Type:  gpupdate /force  and hit ENTER. EXIT

Virus

Image
  What Are the Signs of a Virus Poor performance, application crashes, and computer freezes can sometimes be a sign of a virus or  another type of malware  wreaking havoc. However, that’s not always the case: There are many other  causes of problems that can slow down your PC . Likewise, just because your PC is running fine doesn’t mean it doesn’t have malware. The viruses of a decade ago were often pranks that ran wild and used a lot of system resources. Modern malware is more likely to lurk silently and covertly in the background, trying to evade detection so it can capture your credit card numbers and other personal information. In other words, modern-day malware is often created by criminals just to make money, and well-crafted malware won’t cause any noticeable PC problems at all. Still, sudden poor PC performance may be one sign you have malware. Strange applications on your system may also indicate malware — but, once again, there’s no guarantee malware is involved. Some applica

How to Change the Default Folder for Saving and Opening Files in Office

Image
  How to Change the Default Folder for Saving and Opening Files in Office People who use Office applications know how important saving time is when working. If you have Word or Excel open many times a day, having a way to customize your default locations is a huge time saver. None of us wants to spend minutes browsing through our files to find where our projects are located.   Changing the default locations for saving and opening files is an easy process. Luckily for frequent Office application users, you can do it quickly as well. You just have to navigate to your options and find the advanced file settings. If you locate the correct settings, you have the option to change locations for opening and saving your documents. Need more help? Continue reading to view the available step-by-step guide for each application below. How to Change Default Folder for Saving Documents We wrote these guides for Microsoft Word 2010 and later. Depending on your version of  Word , some steps might be sl

How To Enable Or Disable USB Ports In Windows 10

Image
  Introduction   A key feature in the Windows family is to enable or disable the USB Ports. We can also use this feature in Windows 10 to enable or disable the USB Ports.   Often we have to share our laptop or PC with another person. The person who has a pen drive with viruses and infected files can inject these malicious files into the system to damage the device and also someone who has bad intentions can steal our important documents through pen drive. We can never be too careful to keep our data secure. Disabling the USB Ports is a very good solution to protect our device from viruses and other vulnerabilities This tutorial will show you various methods on, how to Enable or Disable USB Ports in Windows 10.   Method 1 - Using Registry Editor   Using the Registry Editor, you can easily enable or disable the USB Ports.   Step 1   From the Start menu, open the Run dialog box or you can Press the "Window + R" key to open the RUN window.     Step 2   Type "regedit.exe"